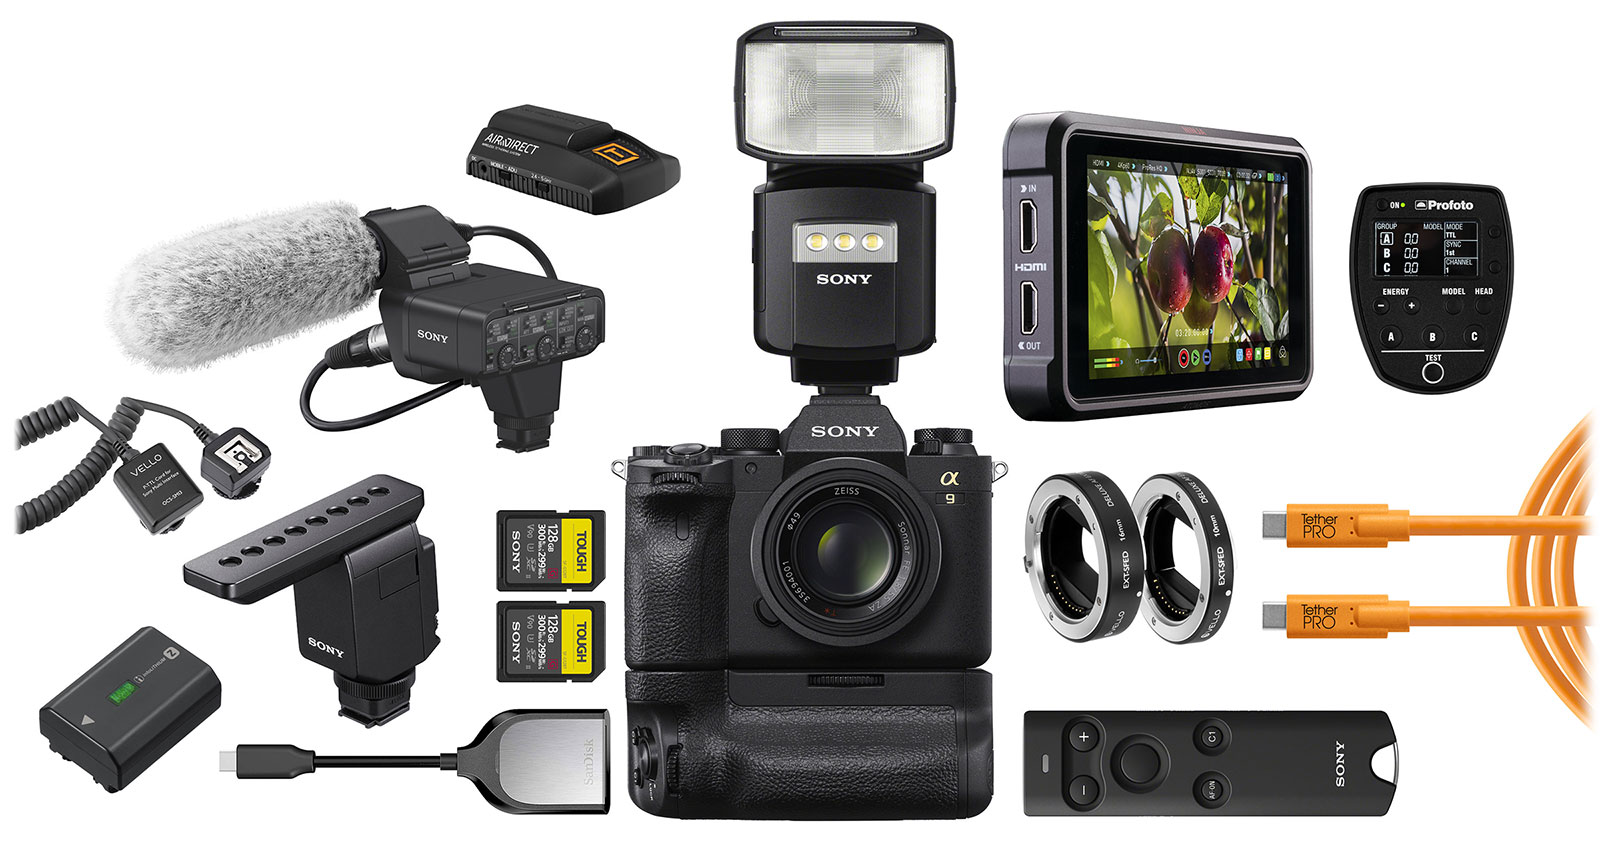
This list will help you navigate your way thru accessories designed for
Sony a9 II mirrorless cameras. Let’s start with three new accessories designed specifically for a9 II and future cameras in this series.
New Accessories for Sony a9 II Cameras
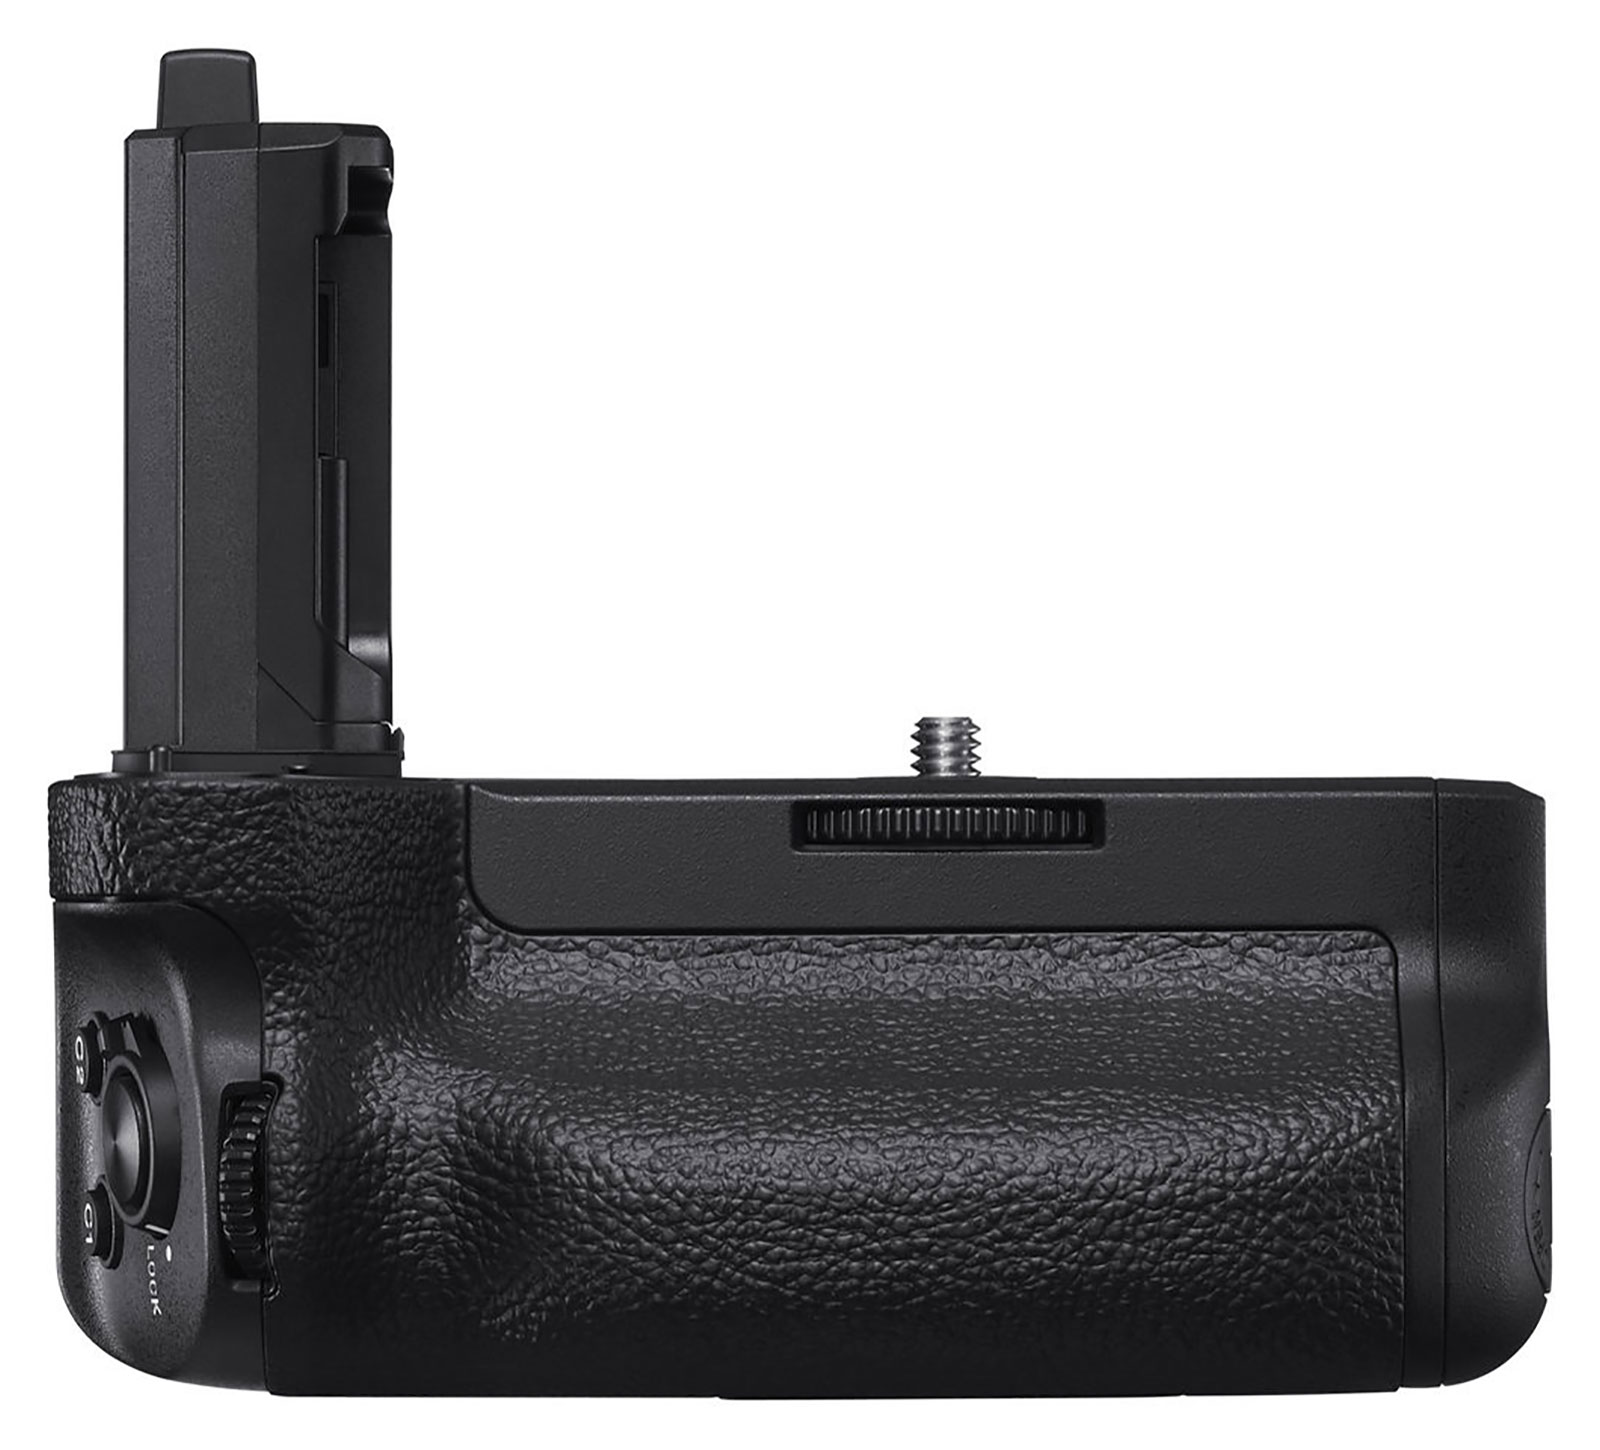 Sony VG-C4EM Vertical Grip ($398)
 is designed for Sony a7R IV & a9 II mirrorless cameras. It offers both double battery capacity and a more comfortable grip when shooting in the vertical orientation. The grip accepts either one or two NP-FZ100 batteries to increase the effective battery life for longer shooting sessions, and the batteries can be charged in the grip while attached to the camera via the body’s USB port. The grip’s design maintains the same layout as the camera body itself, and includes a secondary shutter button and Multi Selector for intuitive use. The VG-C4EM grip is built from magnesium alloy and is dust- and moisture-resistant to match the weather sealing of the camera itself.
Order Sony VG-C4EM Vertical Grip from
B&H Photo |
Amazon
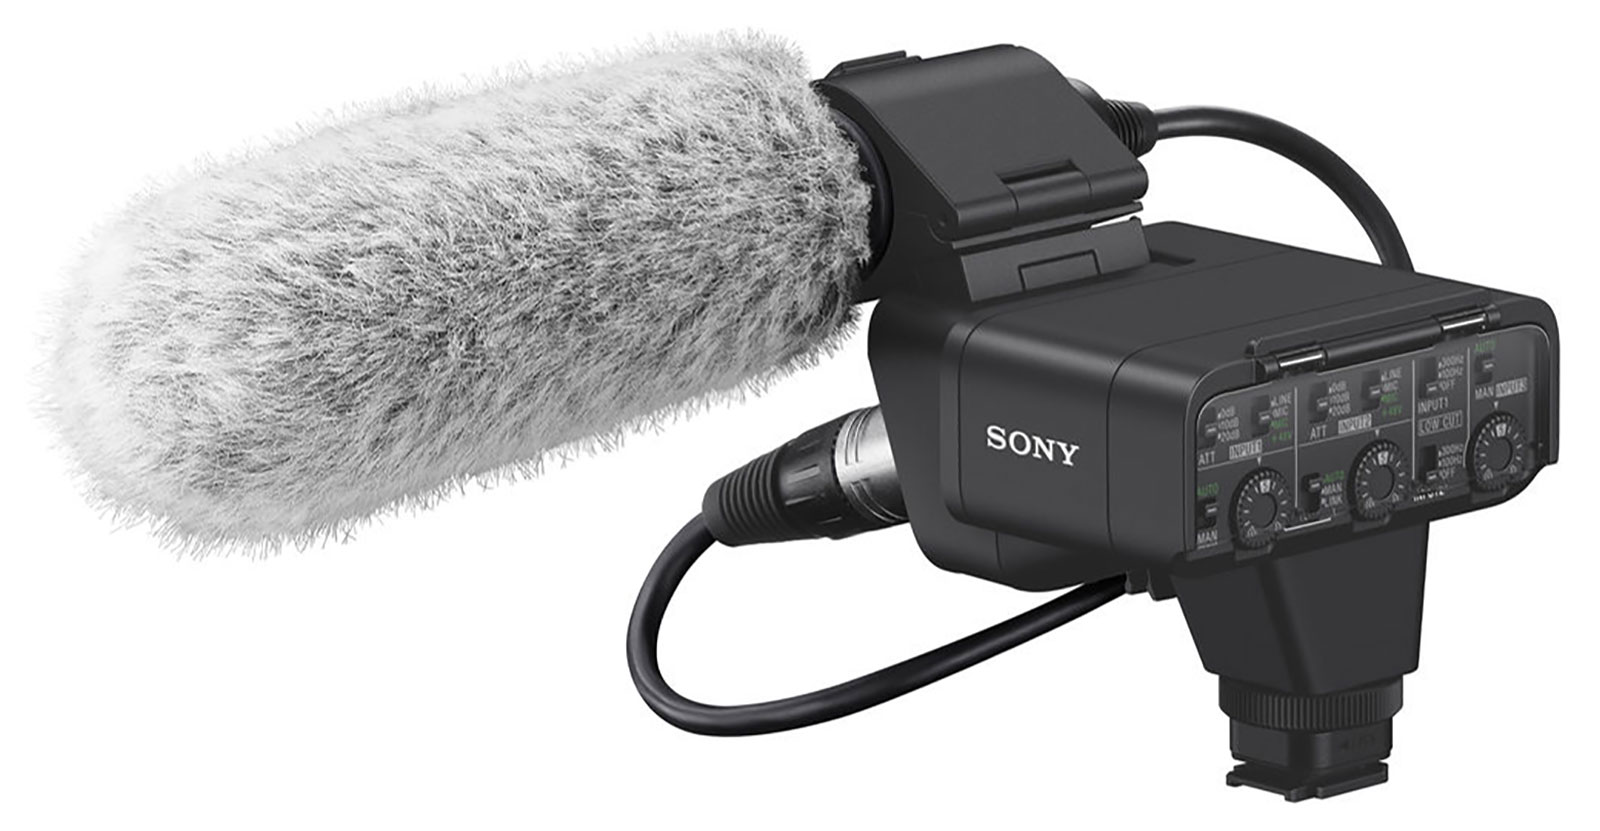
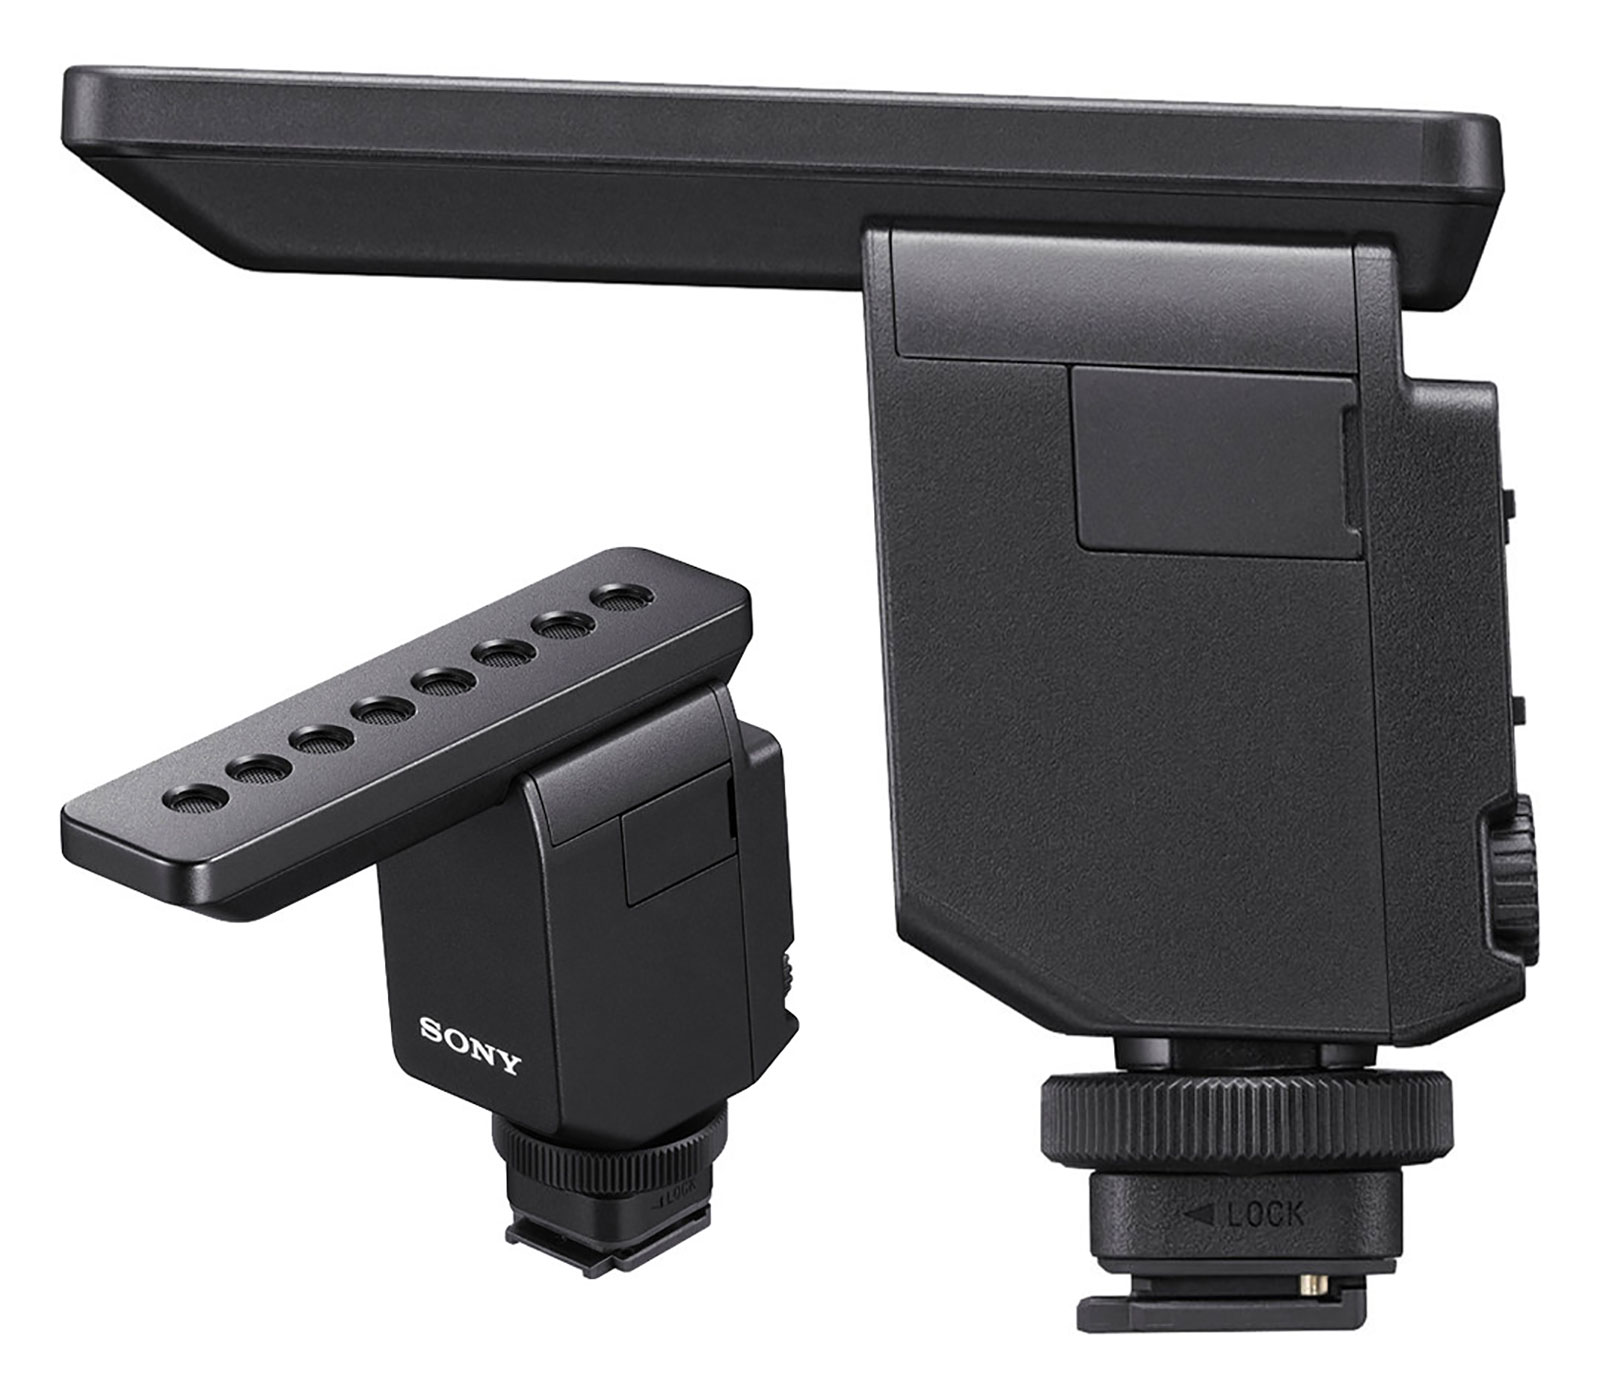 Sony ECM-B1M Digital Shotgun Microphone ($348)
 is an ultra-compact camera-mount digital shotgun microphone designed for mobile video creators working with Sony cameras equipped with the Multi Interface Shoe. Designed for the current generation cameras including a9 II with built-in Digital Audio Interface, the ECM-B1M is able to produce its best quality by delivering a digital audio stream directly to the camera through the Multi Interface Shoe. Other Sony cameras with the standard Multi Interface Shoe can still make use of the microphone as there is a selectable digital/analog output.
Order Sony ECM-B1M Digital Shotgun Microphone from
B&H Photo |
Amazon
 Sony XLR-K3M ($598)
 is a dual-channel digital XLR audio adapter that allows you to connect microphones and other audio sources to cameras equipped with a Multi Interface Shoe. Designed for the current generation cameras including a9 II with built-in Digital Audio Interface built-in digital audio interface, the adapter is able to produce its best quality by delivering a digital audio stream directly to the camera through the Multi Interface Shoe. Other Sony cameras with the standard MI Shoe can still make use of the microphone as there is a selectable digital/analog output. XLR-K3M features two XLR-1/4″ combo mic/line inputs with 48V phantom power, and a 3.5mm stereo input with plug-in power, all with individual level controls.
Order Sony XLR-K3M Digital XLR Adaptor Kit with Microphone from
B&H Photo |
Amazon
Other Top Accessories
Batteries and Chargers
My first suggestion with any camera is to buy an extra battery and external charger. Even though battery life is greatly improved from previous Sony mirrorless camera batteries, you can’t shoot while charging your only battery, picking up a spare
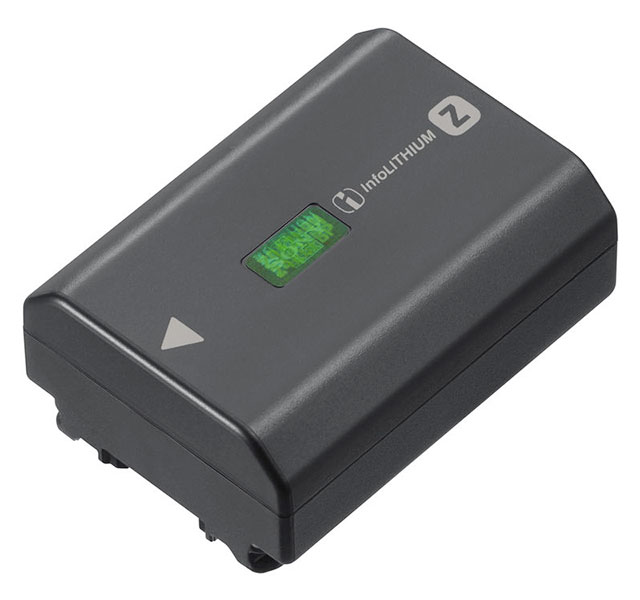
Sony NP-FZ100 Rechargeable Lithium-Ion battery ($78).
Order Sony NP-FZ100 Rechargeable Lithium-Ion batteries from
B&H Photo |
Amazon
Third-Party Batteries and Chargers
I only use original
Sony NP-FZ100 batteries. It seems unwise to risk your $3500 camera to a third-party battery just to save $50. But…if you’re determined to buy third-party replacement batteries, please be aware that many third-party batteries (Wasabi in particular) do not meet Sony compliance stands so PLEASE stick to batteries that comply!
Upgraded RAVPower NP-FZ100 Batteries ($59.95 for two battery + charger kit from Amazon) are manufactured in compliance with Sony specs. The only complaint I’ve received is that RAVPower batteries drain more quickly than OEM Sony batteries
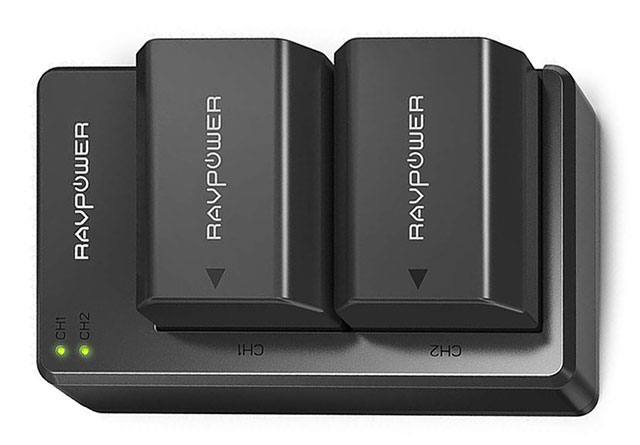
Order Upgraded RAVPower NP-FZ100 Batteries + Charger Kit from
Amazon
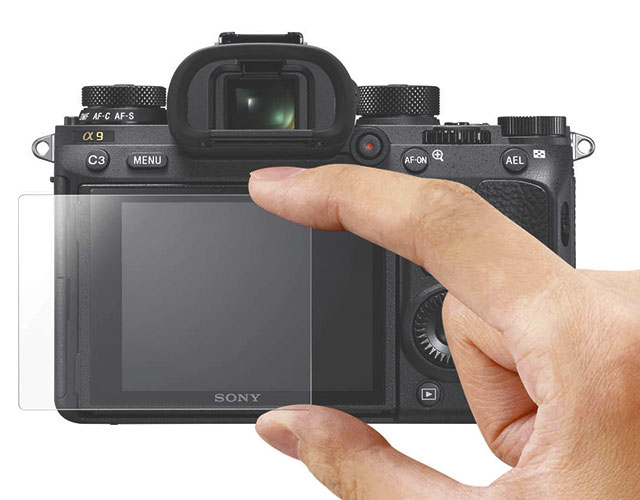
PCK-LG1 Screen Protect Glass Sheet protects a camera’s rear LCD from scratches or marks when in use. Constructed from 9H-rated hard, shatterproof glass, it has an anti-stain coating to resist marks or finger prints. Additionally, it maintains full support for cameras’ touchscreen and tilting functions.
Order Sony PCK-LG1 Screen Protection Glass ($28) from
B&H Photo |
Amazon
UHS II SD Memory Cards
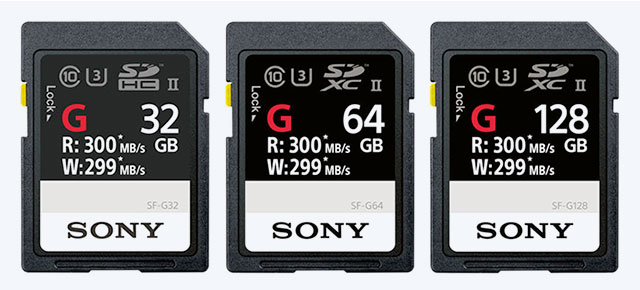
Now that both a9 II SD Card Slots are UHS II compatible, PLEASE stop using UHS-I cards! My SD cards of choice are Sony’s world’s fastest
Sony SF-G cards featuring blistering fast 299MB/s Write Speed & 300MB/s Read Speed perfect for Sony a9 II’s 10 FPS burst shooting, 4K video, and other buffer-busting uses. If you plan to shoot video, you’ll want to stick to 64GB (or larger) SDXC cards for the best video codex.
Sony SF-G ‘Tough’ cards are my cards of choice for their Best-in-Class Write/Read Speed along with ultimate durability.
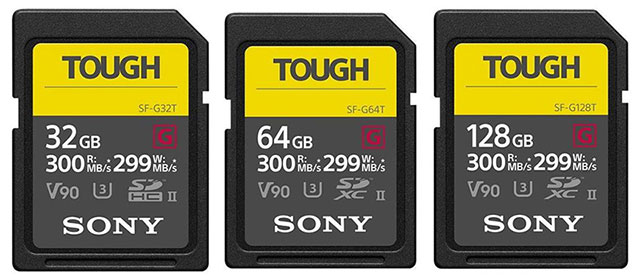
Sony SF-G Series Tough UHS-II SD Memory Cards are available in
32GB,
64GB,
128GB
Order 32GB Sony SF-G Series Tough UHS-II SDHC Memory Cards from
B&H Photo |
Amazon
Order 64GB Sony SF-G Series Tough UHS-II SDXC Memory Cards from
B&H Photo |
Amazon
Order 128GB Sony SF-G Series Tough UHS-II SDXC Memory Cards from
B&H Photo |
Amazon
 Sony SF-G UHS-II SD cards available in 32GB
,
64GB &
128GB (Stick to 64 or 128 GB SDXC cards for video)
Order Sony 32GB SF-G UHS-II SDHC Memory Card from
B&H Photo |
Amazon
Order Sony 64GB SF-G UHS-II SDHC Memory Card from
B&H Photo |
Amazon
Order Sony 128GB SF-G UHS-II SDHC Memory Card from
B&H Photo |
Amazon
If you can’t get your hands on the Sony cards listed above, the next fastest option is
SanDisk Extreme PRO UHS-II SD Memory Cards with 260 MB/s Max Write Speeds. Once again, stick to 64 or 128 GB SDXC cards for video.

Order SanDisk 32GB Extreme PRO UHS-II SDHC Memory Cards from
B&H Photo |
Amazon
Order SanDisk 64GB Extreme PRO UHS-II SDHC Memory Cards from
B&H Photo< |
Amazon
Order SanDisk 128GB Extreme PRO UHS-II SDHC Memory Cards from
B&H Photo< |
Amazon
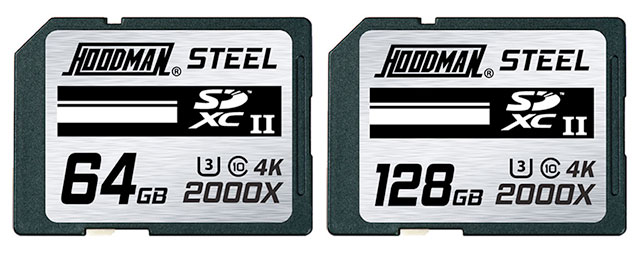 Hoodman Steel 2000x SDXC UHS-II Memory Card available in 64GB
 &
128GB fall short of Sony SF-G speed, but their 260 MB/s a Max Write Speed equals the speed of SanDisk cards with better construction and a lower price.
Order Hoodman 64GB Steel 2000x SDXC UHS-II Memory Cards from
B&H Photo |
Amazon
Order Hoodman 128GB Steel 2000x SDXC UHS-II Memory Cards from
B&H Photo |
Amazon
Memory Card Readers
While you can always download by connecting the camera to your computer using the supplied USB-cord, a MUCH better option is to pick up an SD card reader. Here are two good options
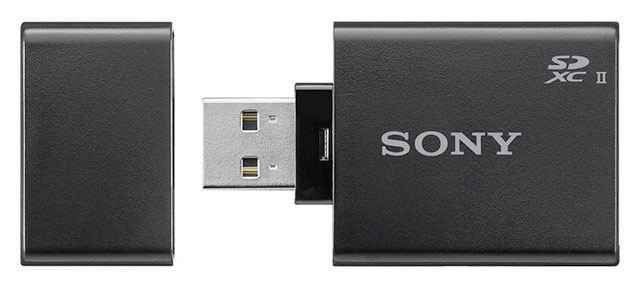 Sony MRW-S1 UHS-II SD Memory Card Reader ($29) from B&H Photo
 |
Amazon
 SanDisk Extreme Pro SD Card USB Type-C Reader ($25) from B&H Photo
 |
Amazon
SD Memory Card Cases
Nothing’s worse than searching around your camera bag trying to find a tiny SD card. Digital card cases can make quick order out of that chaos.
Pelican 0915 SD Memory Card Case will snugly hold the cards in the removable, shock absorbing liner. The water resistant seal ensures that your cards will be safe from moisture, even if the case is submerged in water. To keep track of which cards I’ve shot, I turn the cards face down once I’ve used them.
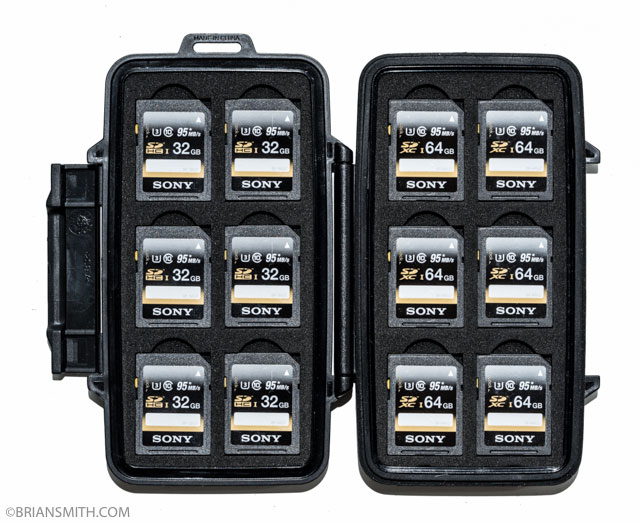 Pelican 0915 SD Memory Card Case ($19.99)
 holds and protects up to 12 SD memory cards.
Order Pelican 0915 SD Memory Card Case from
B&H Photo |
Amazon
Remote Commanders
Remote commanders allow hands-off triggering of a tripod-mounted camera or long bulb exposure times.
 Sony RMT-P1BT Wireless Remote Commander ($78)
 uses Bluetooth connectivity for adjusting certain camera settings and releasing the camera’s shutter within a 16.4′ range. The sleek commander incorporates +/- buttons for adjusting focus, recording, and power/digital zoom functions and has two assignable buttons—AF-ON and C1—that mirror the set functions of the same-named buttons on the camera body. A lock switch prevents accidental settings changes when the remote is not in use. Additionally, an LED indicator light shows the shutter, recording, or AF status. The device is dust and moisture resistant to suit use in trying environments.
Order Sony RMT-P1BT Wireless Remote Commander from
B&H Photo |
Amazon
 Sony RM-VPR1 remote control (B&H
 |
Amazon) and
Sony RMT-DSLR2 Wireless Remote (B&H |
Amazon)
Sony RM-VPR1 remote control with Multi-Terminal Cable ($50) from B&H |
Amazon is a wired remote which allows you to control shutter, optical zoom, digital zoom and bulb functions, as well as control video recording without touching your camera.
Sony RMT-DSLR2 Wireless Remote ($28) from B&H Photo |
Amazon triggers your shutter by sending an infrared signal to the camera’s remote port, ensuring that you don’t shake the camera as you fire it.
Remote Cables
 Vello 3.5mm Remote Shutter Release Cable for Sony Multi-Terminal cameras ($11 from B&H Photo)
 is a budget-priced remote release coble that allows you to trigger your Sony mirrorless cameras remotely using a PocketWizard Plus III, MultiMAX II or any other remote triggers with a 3.5mm mini-plug port.
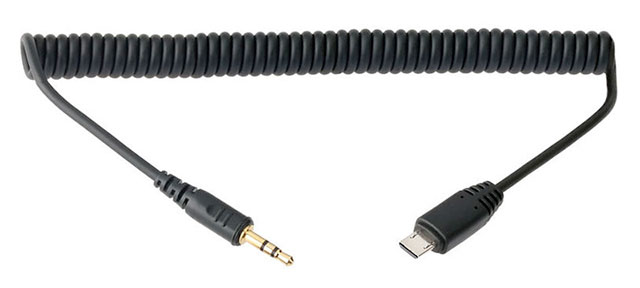
 PocketWizard Remote Trigger Cable for Sony ($32)
 PocketWizard Cables are never the cheapest but they are the most reliable. If you’re mounting your camera in a catwalk or some other hard to reach remote location and you value reliability over price, these cords will allow you to remotely trigger your Sony cameras using PocketWizard Plus III, MultiMAX II as well as control the half-press function. The 3′ cable has a 1/8″ stereo miniphone connection at one end and Sony’s Multi/micro-USB attachment at the other.
 PocketWizard Remote Camera Cable with Camera Power for Sony ($40)
 has a Multi/micro-USB connection and a USB Type-A on one end, and the other end has a 3.5mm stereo miniphone connection. The miniphone jack is compatible with any Pocket Wizard radio and plugs directly into the radio’s synch port. The other end plugs into the camera’s Multi/micro-USB port to establish a connection from the receiving radio to fire off the camera. This type of connection keeps the camera continuously awake and ready to fire at a moment’s notice.
With a transmitting radio, the same miniphone connection is used, but the Multi/micro-USB connection is plugged into the compatible RM-VPR1 Remote Commander to send the signal when pressed. Half press function is available when using a Plus III as a transmitting radio and a Plus III or Plus IV radio as a receiving radio with Channels 17-32. Pre-trigger function is available when using a Plus III, MultiMAX, or MultiMAX II as a transmitting radio and a Plus III, MultiMAX, or MultiMAX II as a receiving radio with Channels 17-32. To supplement power to the camera, plug into the micro-USB port and the USB Type-A connection plugs into an external battery power to extend the camera’s working capacity.
Intervalometers
Here are wired & wireless intervalometers that will work with Sony a7 Series cameras:
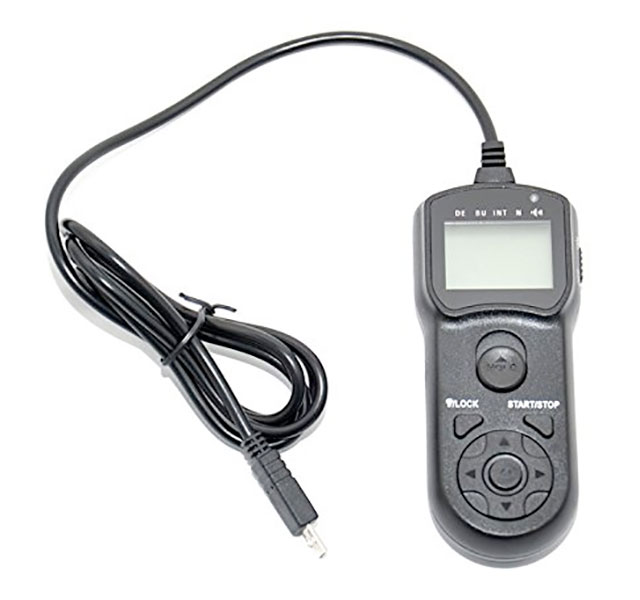 JJC TM-F2 Wire Multi-Function LCD Timer Remote for Sony Multi-Terminal ($26 at Amazon)
 This is the choice of time-lapse specialist Sony Artisan Drew Geraci for it simplicity, size and easy to read display.
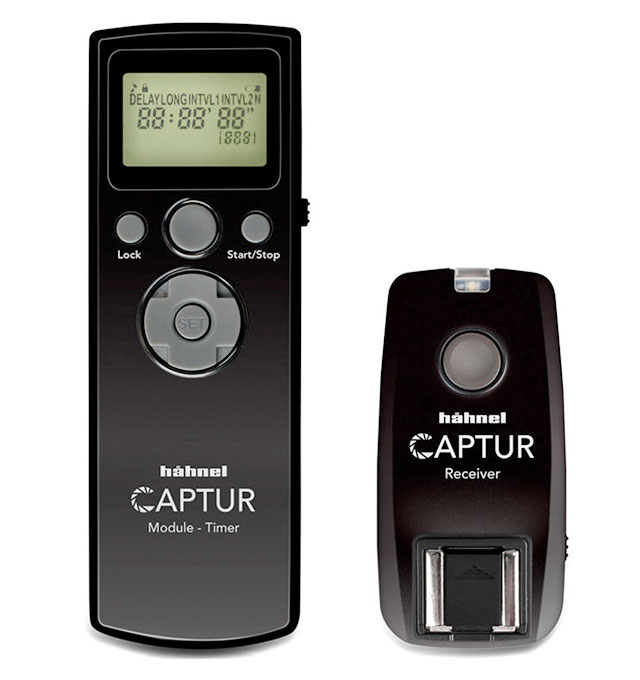 hahnel Captur Timer Kit for Sony ($89 at B&H Photo)
 This bundle enhances your Captur remote shutter release system by providing a AA battery-powered interval timer module, as well as a receiver for mounting on a camera. Additional receivers are available for firing even more DSLRs. Use this kit with the transmitter you already have, or purchase one separately. As an alternative to wireless operation, the system can function in wired mode, and this kit includes the cables for connecting both the receiver and timer module to the camera. The module features single, continuous, and bulb exposure modes, allowing you to choose from a huge range of exposure times with the continuous and bulb settings.
Hotshoe Flashes
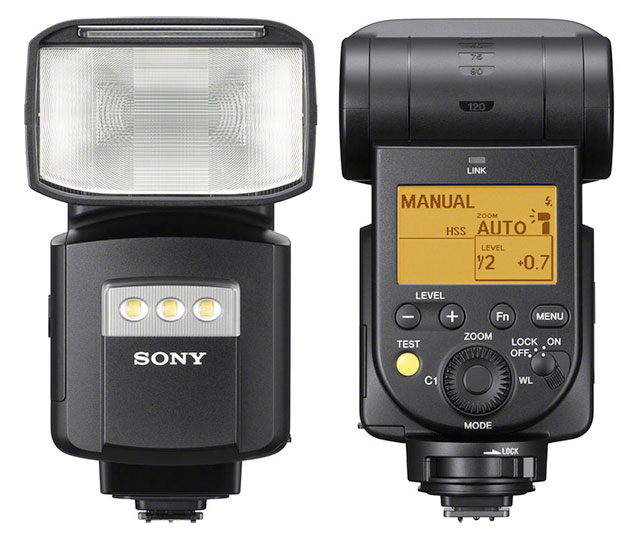
 Sony HVL-F45RM Wireless Radio Flash ($398) from B&H Photo
 |
Amazon 2.4 GHz radio controlled flash features built-in wireless capability of operating up to 15 flashes in 5 groups.
When mounted on camera, Sony HVL-F45M can act as a flash commander or it can be triggered off-camera using a
Sony FA-WRC1M Wireless Radio Commander using built-in 2.4 GHz wireless wireless connection capability of operating up to 15 flashes in 5 groups.
HVL-F45RM reduces size and weight over 10% from the previous model while improving the guide number to 148′ at ISO 100 and 105mm and improving the recycle time to 2.5 seconds. Full bounce capabilities are available as well with tilt from -8 to 150 degrees and a total of 360 degrees of rotation. Also, it has a zoom head of 24-105mm which can be expanded to 15mm with a pull-out diffusion panel alongside an LED light useful for video. The flash offers vastly improved controls via the rear LCD, including customizable buttons and flash distribution and memory settings. HVL-F45RM has a dust- and moisture-resistant construction.
Order Sony HVL-F45RM flash from
B&H Photo |
Amazon
 Sony HVL-F60RM Wireless Radio Flash ($598) from B&H Photo
 |
Amazon is equipped with a built-in 2.4 GHz radio transceiver to allow photographers to quickly create portable lighting setups with complete support for P-TTL / ADI metering.
This flash can be set as a commander or a remote that fully supports Sony’s existing radio commanders and receivers, including ratio control, the ability to work with up to 15 flashes in five groups, and access to 14 channels. The flash works within Sony’s optical wireless flash system as well, where it is also able to operate as either a commander or remote unit.
Compared to its predecessor, and in addition to the added radio transceiver, the HVL-F60RM also has improved overheating protection for more consistent and reliable performance. It has a guide number of 197′ at ISO 100 and 105mm, along with an improved recycle time of 1.7 seconds. Full bounce capabilities are available, too, with tilt from -8 to 150° and a total of 180° of rotation.
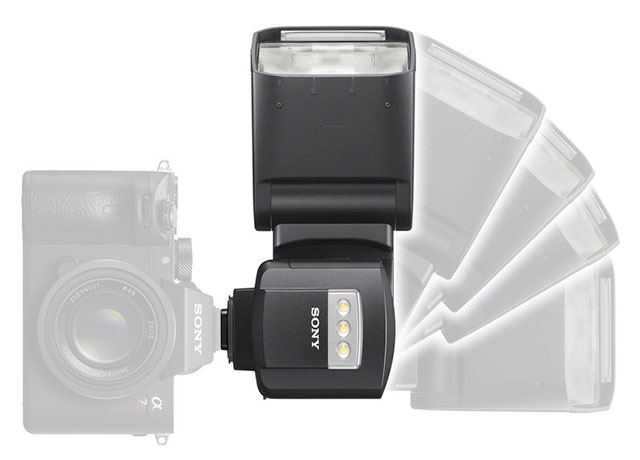
Also, it has a zoom head of 20-200mm which can be widened to 14mm with a pull-out diffusion panel. The front-facing LED light has been updated and can now also be used as an AF illuminator with E-mount mirrorless cameras for more reliable, faster focusing in low-light conditions. Additionally, the flash also has a dust- and moisture-resistant construction along with a durable metal foot.
Sony HVL-F60RM Flash has a dust- and moisture-resistant construction along with a durable metal foot
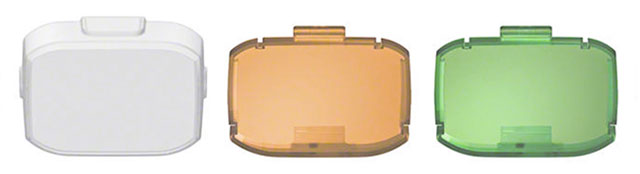
Sony HVL-F60RM Flash includes plastic white soft diffusion, tungsten & florescent conversion panels
Order Sony HVL-F60RM Wireless Radio Flash from
B&H Photo |
Amazon
 Profoto A1X AirTTL-S Studio Light for Sony ($1095) from B&H Photo
 |
Amazon has a new more powerful battery that gets 450 full power flashes instead of 350, faster full power recycling time of 1 second instead of 1.2 seconds, 20 wireless channels instead of 8, and an updated interface similar to the one on the B10.
The first thing you’ll notice about the A1X is its 2.75″ round, tilting, rotating head, which is the physical feature most responsible for the A1X’s natural-looking light with its soft gradual fall-off. The auto-zoom built into the head handles focal lengths from 32 to 105mm and the included Wide Lens gives you wide-angle coverage from 14 to 24mm. You can override the auto-zoom function at any time and make your adjustments manually. A
Profoto Gel Kit ($99) with graduated CTO conversion filters and a fluorescent filter is also separately available to modify the unit’s daylight color temperature.
The A1X recycles in 1 second, faster than most flash units in its class and has action-stopping flash durations from 1/800 to 1/20,000 second. The A1X supports HSS (High-Speed Sync) allowing you to shoot at shutter speeds as short a 1/8000 second instead of 1/250 to blur a distracting background using a wide aperture while controlling strong ambient light behind your subject. The 76Ws head has an LED modeling light that can give you a preview of how the light is falling on your subject. It can be turned on or off, set to automatically adjust proportionally to the power level selected, or just switched to manual where it can be modified by hand. All adjustments are indicated on the exceptionally readable white on black LCD display.
The A1X is powered by an included lithium-ion battery that has a capacity of 450 full power flashes (instead of the previous model’s 350). Power is topped up on an exhausted battery in about 80 minutes with the included 100-240 VAC charger. The battery doesn’t fade as its power is used, operating at peak performance until it’s depleted. You can purchase additional
Profoto Li-Ion Batteries for A1X ($119).
It’s the Air Remote TTL that allows you to explore and control the A1X’s full capabilities. It wirelessly allows assignment of channels and groups as well as TTL and power level. In fact, the A1 has a switch that allows you to set your main light to TTL, switch to manual operation to adjust manual units in other groups to ratio their output, then switch back to TTL and return to the original TTL setting which was stored for you.
Profoto A1X also has +/-3 stops of exposure compensation that can be modified from the remote for your specific needs. The light also comes with a Bounce Card, 180-degree Dome Diffuser, Flash Stand, and a nylon bag with shoulder strap for storage and transport.
Order Profoto A1X AirTTL-S Studio Light for Sony from
B&H Photo |
Amazon
Flash Commanders
For Sony HVL-F45RM & HVL-F60RM Wireless Radio Flashes:
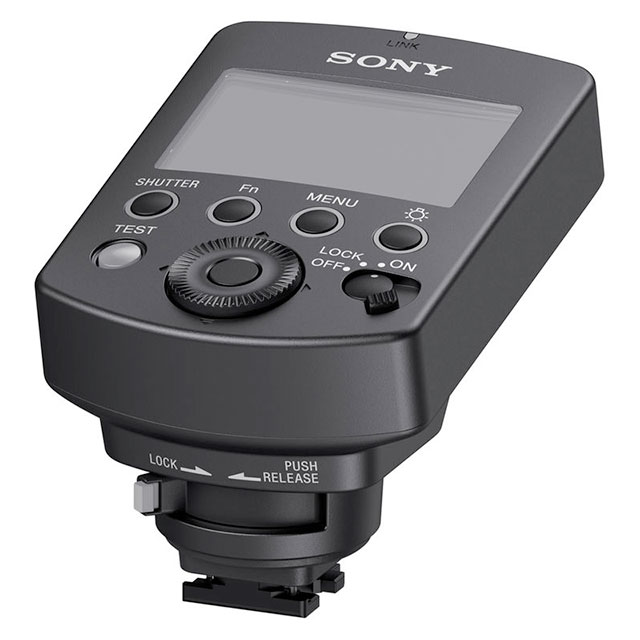 Sony FA-WRC1M Wireless Radio Commander ($348) from B&H Photo
 |
Amazon this Multi Interface Shoe compatible remote flash commander can control up to 15 separately available FA-WRR1 Wireless Radio Receivers or radio-equipped RM-series flashes from up to 98.4′ away thanks to a 2.4 GHz radio system. This configuration also permits operation without requiring line of sight with all the units involved. Additionally, it has access to 14 channels for avoiding interference with other radio triggering systems in the vicinity as well as up to 5 groups for precise control over your lights.
The major benefit of the Wireless Radio Commander is remote control over your flash’s settings. This includes exposure compensation, flash power from 1/1 to 1/256, zoom, and more. Along with this, the radio system has full compatibility with Sony’s TTL method and supports High-Speed Sync at up to 1/8000 second. Other flashes can be triggered in a manual mode and a PC sync terminal is available for connecting to various strobes and other lights. In addition to all of this, the Commander is equipped with a Multi Terminal for connection and controlling other cameras.
For Profoto Wireless Radio Flashes:
These two Profoto Remotes offer TTL and HSS with
Profoto A1X,
B1,
B1X,
B2,
B10,
B10 Plus &
D2 flashes
 Profoto Air Remote TTL-S for Sony ($429) from B&H Photo
 |
Amazon is a small, wireless radio transmitter for Sony Multi Interface shoe cameras. This powerful remote provides you with an outstanding set of features, including support for wireless power control and TTL, including high-speed sync, with Sony cameras. Operating on a 2.4 GHz frequency, the Air Remote can sync with flashes up to 1000′ away with normal triggering and 330′ with TTL. TTL is useful because it offers automated shooting and exposure and brings the advantage of high-speed sync, enabling the use of shutter speeds up to 1/8000 second. Also, the controller has 8 channels and 3 groups, ensuring minimal interference with other nearby systems and equipment. Each group can be controlled independently from one another, permitting ±2 EV adjustment of power ratios for TTL systems and nine stops of manual control. You have access to remotely turn on/off the modeling lights or heads, making it easier to adjust lights in your studio. Additionally, there is a mini-USB port for installing firmware updates and it runs on two AAA batteries.
Order Profoto Air Remote TTL-S for Sony from
B&H Photo |
Amazon
 Profoto Connect Wireless Transmitter for Sony ($299) from B&H Photo
 |
Amazon offers simple wireless connection with AirTTL lights that controls flash sync, remote control, Auto TTL, and HSS. The transmitter also controls flash sync and remote control in Air lights. There are three settings on the Connect transmitter itself. Auto being the first, takes all the guess work of setting up your flashes. The manual setting is there if you want to set the flashes yourself and be more creative. The final setting, of course, is to turn it off when the transmitter is not in use.
By downloading the Profoto app and with Bluetooth connection, you can control your lights wirelessly as well and upgrade your firmware later through the app. The Connect works on a frequency of 2.4 GHz and up to eight channels with an operating range of a 1000′ when using it with normal sync flash and remote control, and 330′ with Auto TTL and HSS. The built-in lithium-ion polymer battery has a battery life of 30 hours and is rechargeable via the included USB cable. Additionally, the transmitter powers off after 60 minutes of inactivity.
Order Profoto Connect Wireless Transmitter for Sony from
B&H Photo |
Amazon
Off-Camera TTL Flash Cords
 Vello Off-Camera TTL Flash Cord for Sony Multi Interface Shoe (Available in 1.5′, 3′, 6.5′ & 33′ lengths)
 allow you to remotely fire Sony flashes with ADI / P-TTL capabilities and the Multi Interface Shoe – removing the flash from the camera’s hot shoe reducing the harsh shadows commonly encountered with direct on-camera flashes and gives your photographs a more natural look.
Available in four lengths:
1.5′ Vello Off-Camera TTL Flash Cord for Sony Cameras with Multi Interface Shoe ($27.95 at B&H Photo)
3′ Vello Off-Camera TTL Flash Cord for Sony Cameras with Multi Interface Shoe ($29.95 at B&H Photo)
6.5′ Vello Off-Camera TTL Flash Cord for Sony Cameras with Multi Interface Shoe ($39.95 at B&H Photo)
33′ Vello Off-Camera TTL Flash Cord for Sony Cameras with Multi Interface Shoe ($54.95 at B&H Photo)
The shorter 1.5′, 3′ & 6.5′ coiled options are ideal for hand-held off-camera lighting or with flash mounted on a compact flash bracket. The longer the 33′ straight length is ideal when mounting flash on a light stand.

One side of the TTL cable fits directly into the camera’s hot shoe to ensure that all of the camera’s exposure data is maintained. The other side can be attached to any stand, tripod, or device with a standard 1/4″-20 threaded stud or flash shoe mount and the shoe has a locking knob to ensure your equipment is secure.
Tripods
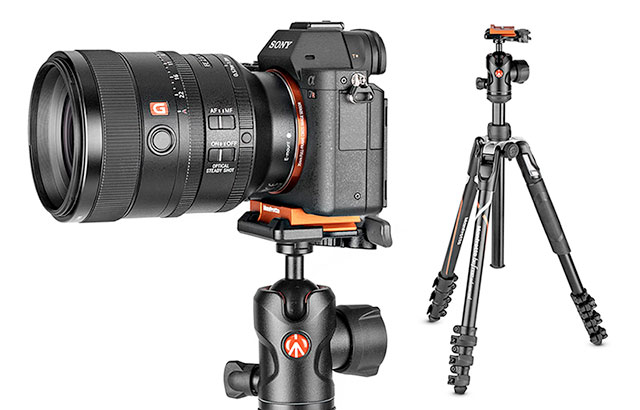 Manfrotto Befree Advanced Alpha Travel Tripod ($190 Aluminum)
 |
($390 Carbon Fiber) This special version of the Befree Advanced Lever is designed for Sony alpha camera owners who want maximum performance and stability in all shooting positions.
Manfrotto Befree Advanced Alpha Travel Aluminum Tripod from
B&H Photo |
Adorama
Manfrotto Befree Advanced Alpha Travel Aluminum Tripod from
Amazon
Manfrotto Befree Advanced Alpha edition includes a quick-release plate is designed to match Sony a7 and Sony a9 camera bodies, to ensure perfect grip, even in the most angled camera shots. The front jut of the plate physically blocks the camera, preventing any play both on tilt and rotational movements, always keeping the camera stuck to the head plate.

The plate is also fully compatible with the world’s most widespread standard head attachments: Manfrotto RC2 and Arca-swiss style. With this aluminium plate fixed to the camera, all Manfrotto heads and almost all tripod heads on the market featuring Arca-style attachments can be set up rapidly and effortlessly, without disassembling components.
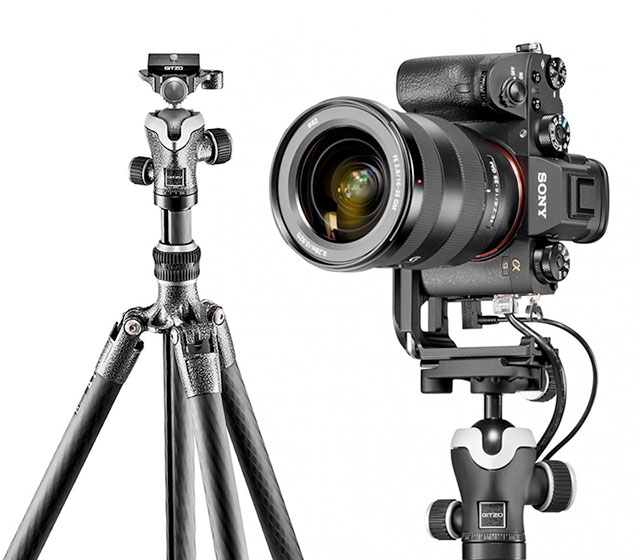 Gitzo Traveler Alpha tripod ($999 at B&H Photo)
 is a premium quality black and silver travel tripod with carbon legs weighs only 1.43 kg. With a packed size of 43 cm, offers a maximum working height of 165 cm and is designed for 10 kg camera/lens combinations. At maximum leg spread and the use of the short center column is designed to allow low shooting angles. Legs lock using “Traveler G-Lock” locks, a particularly compact variant of Gitzo’s G-Lock rotary closure system, specially developed for travel tripods. The Traveler Alpha is equipped with Gitzo’s most compact ball head. The pan and tilt axes can be locked independently of each other. For the transport, a carrying strap made of Italian leather in carbon look is included in the delivery.
Gitzo L-Bracket for Sony a7R III and a9 Cameras ($199 at B&H Photo). allows comfortable alignment of Sony a7 III, a7R III and a9 cameras and facilitates quick change between landscape and portrait. Milled from a solid block of aluminum, the new rail is the lightest of its kind, according to the manufacturer, it offers four mounting points for the camera designed for shooting video or tethered shooting in the studio. The supplied Allen key can be fixed in a separate holder.
One of my favorite accessories for any camera is an L bracket which allows you to easily move your camera from vertical or horizontal when shooting on a tripod that accepts Arca Swiss standard. No more hanging your camera off one side of the tripod to shoot verticals. Sony a9 II has a new body design, so previous L-Plates will not fit. The following L-plate brackets are compatible with both a7R IV and a9 II.
 PCTC Skidproof L Plate Camera Bracket for Sony a9 II ($65.99 from Amazon)
 This L-shape Arca QR plate specially designed for Sony a7R IV & a9 II cameras features baseplate & side Arca standard grooves design with adjustable grip width that’s extendable up to 27mm.
In-stock at Amazon and available with Amazon Prime Shipping

 Stabil LSIV – L Plate Bracket (Orange) for Sony a9 II ($99.92 from Amazon)
 Its bright Alpha Orange color makes this the most striking L-Plate on the list. Precision machined from solid blocks of 6061-T6 aluminum. Stabil LSIV L plates feature precisely contoured anti-twist flanges for a perfect fit that prevents twisting between the camera and L plate with soft material. With its Arca-type compatible dovetail, it enables the camera to mount in a vertical or horizontal position. The Stabil L plate LSIV does not block the LCD monitor from tilting, it easy access to the battery door as original design.
In-stock at Amazon and available with Amazon Prime Shipping
 SmallRig LCS2417 L-Bracket for Sony A9 II ($46.90 Pre-order from SmallRig)
 Both the side plate and base plate are Arca compatible, with sensor centering marks on each axis, allowing quick switch of your camera from vertical to horizontal. It comes with multiple 1/4” threaded holes allowing mount of accessories. For example, mount the
SmallRig Cold Shoe Mount 1593 to attach a microphone and mount
SmallRig Cable Clamp 2259 to protect the HDMI cable and port. The side plate can be extended to left by 26mm if you need more room for tethering or cable release. It is compatible with the Peak Design Clutch and other hand straps.
Estimated shipping date November 18, 2019
 SmallRig Cold Shoe Mount 1593 ($6.87)
 &
SmallRig Cable Clamp 2259 ($19.90)
 Quick Release L Plate Bracket with Scalable Extension for Sony a9 II ($35.95 on eBay)
 Compatible with Arca-Swiss stardard, both the LB-A7R IV base plate and vertical plate are 100% compatible with RRS lever-release clamp. It features a detachable design, the base plate and vertical plate can be easily disassembled and assembled to fit different shooting experience. LB-A7R IV grip will not affect battery compartment lid opening and the data cables hatch opening. The base plate has reserved extra 1/4”-20 threaded mounting holes and strap hole for additional functions.
FREE Standard SpeedPAK from China/Hong Kong/Taiwan
 Red Quick Release L Plate Bracket with Scalable Extension for Sony a9 II ($35.88 on eBay)
 Red version of the Quick Release Plate L-bracket for Sony a7RM4 listed above, compatible with Arca-Swiss stardard, both the LB-A7RIV base plate and vertical plate are 100% compatible with RRS lever-release clamp. Features a detachable design, the base plate and vertical plate can be easily disassembled and assembled. LB-A7RIV grip will not affect a9 II battery compartment lid opening and the data cables hatch opening, will not affect the screen folding and opening, will not affect the installation battery. Base plate has reserved extra 1/4”-20 threaded mounting holes and strap hole for additional functions.
FREE Standard SpeedPAK from China/Hong Kong/Taiwan
 Kirk BL-A7R4 L-Bracket for Sony a9 II ($150 from B&H Photo)
 Solid one-piece design, with anti-twist flanges that keep your camera from moving within the bracket. With its Arca-type dovetails, it enables you to mount the camera in a vertical or horizontal position onto a compatible head, and the black anodized 6061-T6 aluminum L-bracket has a slotted design for side port access. The bracket will not block the LCD monitor from tilting, it provides access to the battery door, and it has a hand strap loop machined on the right-hand side. The included hex wrench is used to tighten the L-bracket to the camera body, and it stores under the horizontal plate. A quick disconnect mounting socket is located on the bottom and sensor centering lines are on the back, so the camera can be aligned on a tripod head.
Expected availability: 7-10 days
 Really Right Stuff Sony a9 II Ultralight L-Bracket ($140 Pre-order from B&H Photo)
 Solid one-piece design that is Arca-type compatible and facilitates easier, more stable switching between horizontal and vertical shooting orientations when working on top of a tripod. The CNC-machined 6061-T6 aluminum plate maintains complete access to the camera’s battery door and side ports. It also has an anodized Type II black finish that is resistant to scuffs and scratches and laser-engraved center marks on the back for alignment on a tripod head.
Expected availability: Dec 4, 2019
 Really Right Stuff L-Plate Set for Sony a9 II ($190 Pre-order from B&H Photo)
 Modular design composed of an Arca-type compatible base plate and L-component that facilitate easier, more stable switching between horizontal and vertical shooting orientations when working on top of a tripod. The CNC-machined 6061-T6 aluminum L-plate set maintains complete access to the battery door without obstructing the tilting LCD monitor of the camera. Plus, the L-plate set has been type II black anodized, which makes it resistant to scuffs and scratches. Furthermore, the base plate has laser-engraved center marks on the back to align it on a tripod head.
Expected availability: Dec 4, 2019
 Really Right Stuff Sony a9 II L-Plate with Grip ($205 Pre-order from B&H Photo)
 If you need a L-Bracket to use with vertical grip VG-C4EM, this is it. Modular design that is handled comfortably by its ergonomic extended grip. The L-plate is composed of an Arca-type compatible base plate and L-component that facilitate easier, more stable switching between horizontal and vertical shooting orientations when working on top of a tripod. The CNC-machined 6061-T6 aluminum plate maintains complete access to the camera’s battery door and side ports. It also has an anodized Type II black finish that is resistant to scuffs and scratches and has laser-engraved center marks on the back for alignment on a tripod head. A 1/4″-20 threaded socket is located on the bottom of the plate to add accessories to the L-plate.
Expected availability: Dec 5, 2019
Tethering Cables
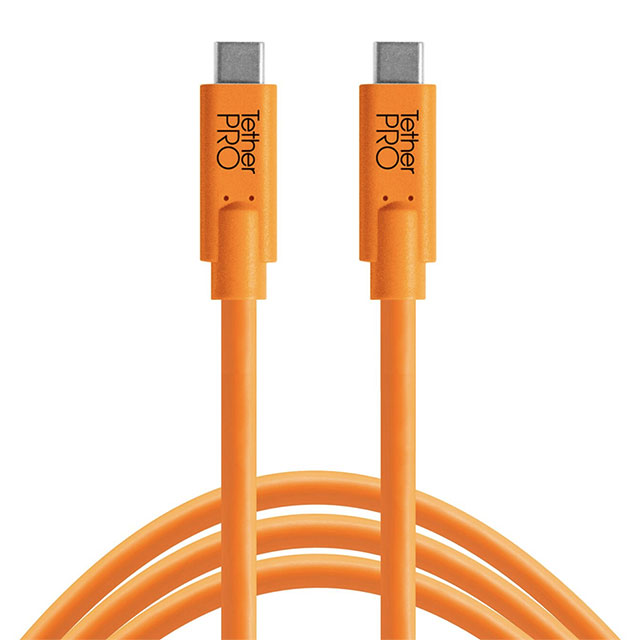
Tether Tools is my choice for best tethering cables on the market. Their new USB-C tethering cables are the perfect match for Sony a9 II.
For computers with a USB-C port:
Tether Tools TetherPro USB-C to USB-C (15′ Orange)
For computers with a USB 2.0/3.0/3.1 port:
Tether Tools TetherPro USB 3.0 to USB-C (15′ Orange)
Wireless Tethering
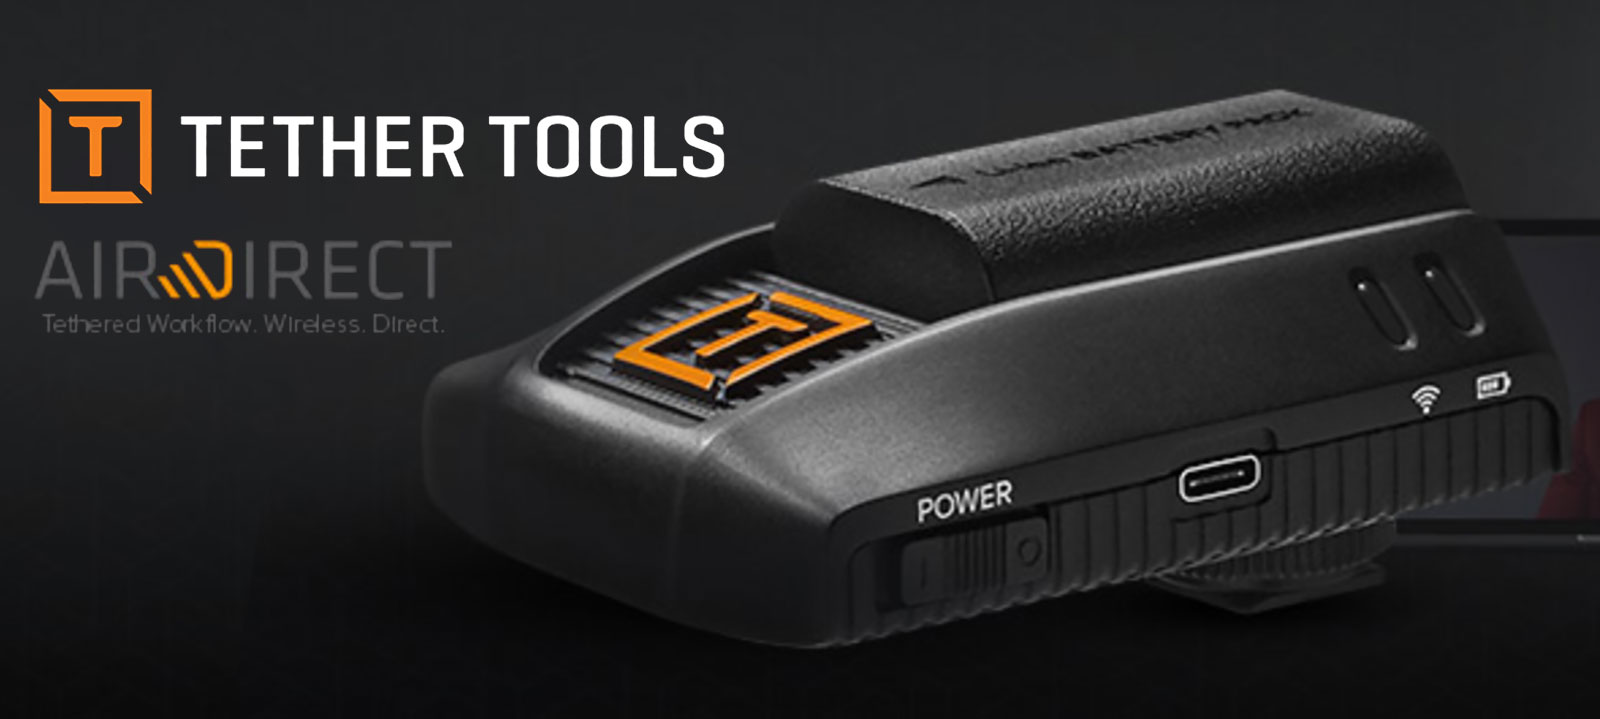 Tether Tools Air Direct Wireless Tethering (Pre-order Now $329)
 offers advanced tethering technology allowing you to tether Sony cameras wirelessly to Capture One, Imaging Edge Remote & Smart Shooter 4. It connects through the camera’s USB tethering port and provides all the same control and tethering options possible with wired tethering. Designed to reach the maximum transfer potential 5Ghz 802.11AC has to offer, Air Direct has two antennas with no interference from metal camera housings.
External Battery Packs
Need to run your camera all-day without A/C power? Here are three external battery pack options that will work while tethering through the USB-C port. They are also ideal for time-lapse photographers or video crews shooting extended day-long shoots.
 (1) ANDYCINE Sony NP FZ100 Dummy Battery Converter ($36 from Amazon)
(1) USB Power Bank of your choice (Available from Amazon)
(1) ANDYCINE Sony NP FZ100 Dummy Battery Converter ($36 from Amazon)
(1) USB Power Bank of your choice (Available from Amazon)
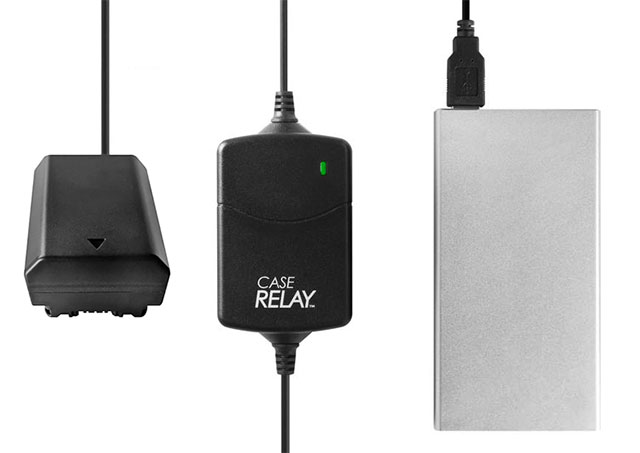 (1) Tether Tools Relay Coupler NPFZ100 ($35 from B&H Photo)
(1) Tether Tools Case Relay* ($100 from Amazon
(1) Tether Tools Relay Coupler NPFZ100 ($35 from B&H Photo)
(1) Tether Tools Case Relay* ($100 from Amazon |
B&H Photo)
(1) USB Power Bank of your choice (Available from Amazon)
*Case Relay has a built-in 7.4V, 1,200mAh lithium battery which adds the ability to hot swap USB Power Banks without shutting down.
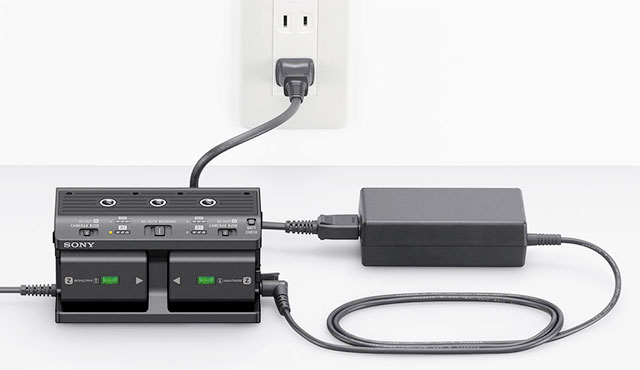
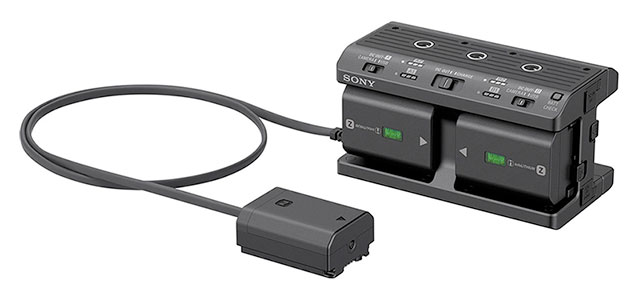 Sony NPA-MQZ1K Multi Battery Adapter Kit ($398 at B&H Photo – includes Two NP-FZ100 Batteries)
Sony’s NP-FZ100 batteries pack a lot of power yet if you find yourself needing more, Sony NPA-MQZ1K Multi Battery Adapter Kit might be just what you need for time lapse photography or extended video shoots since it is able to supply power from up to four NP-FZ100 series battery packs for dramatically extended shooting times. At four bills – it’s not cheap, but it includes two NP-FZ100 batteries that would run you $160.
 Sony NPA-MQZ1K Multi Battery Adapter Kit
 can also serve as a rapid charge, with a charging rate of 480 minutes for four batteries. Users can convert the adapter into a more compact two-battery adapter for a more travel-ready kit.
[Please Note: Due to a clever dual dummy battery set-up, Sony NPA-MQZ1K Multi Battery Adapter is also compatible with cameras using W-style Sony batteries including a7-Series, a6000-series and NEX]
A/C Continuous Power Adapters
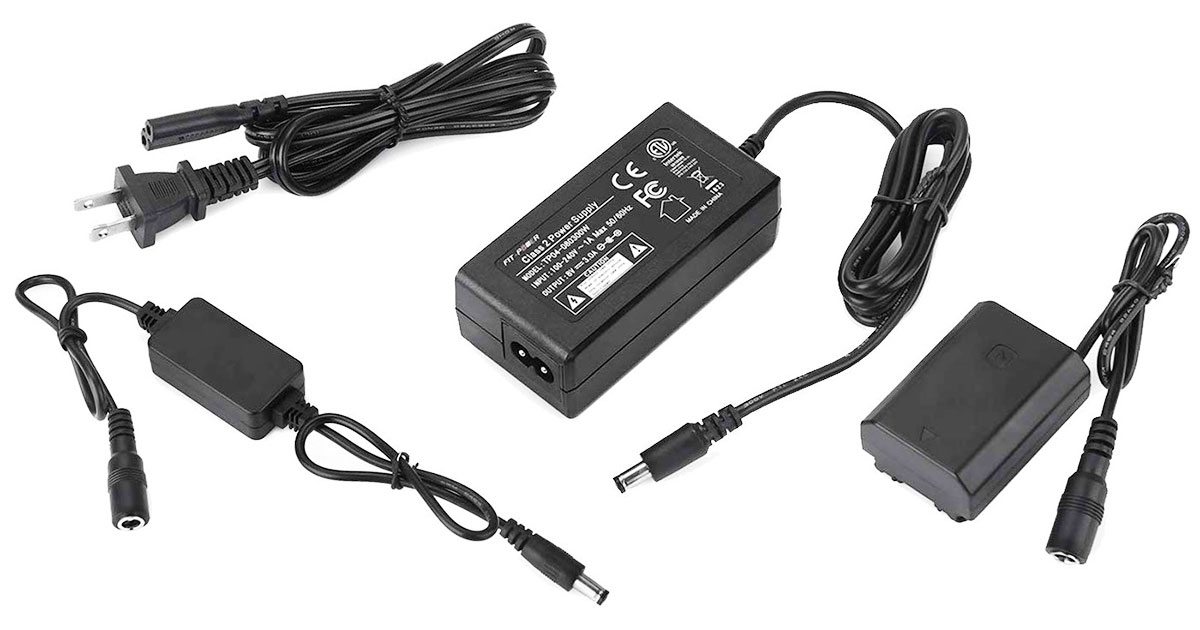 Fit-Power NP-FZ100 AC Power Adapter ($38.99 from Amazon)
 offers continuous A/C power for Sony a9, a9 II, a7 III & a7 IV Series cameras. NP-FZ100 dummy battery kit replaces the Sony NP-FZ100 Z-series battery and allows continuous studio photography without the need to replace and recharge multiple batteries. Made by flame-retardant plastic and electronic components that offer over-voltage protection and over-current protection.
Rain Covers
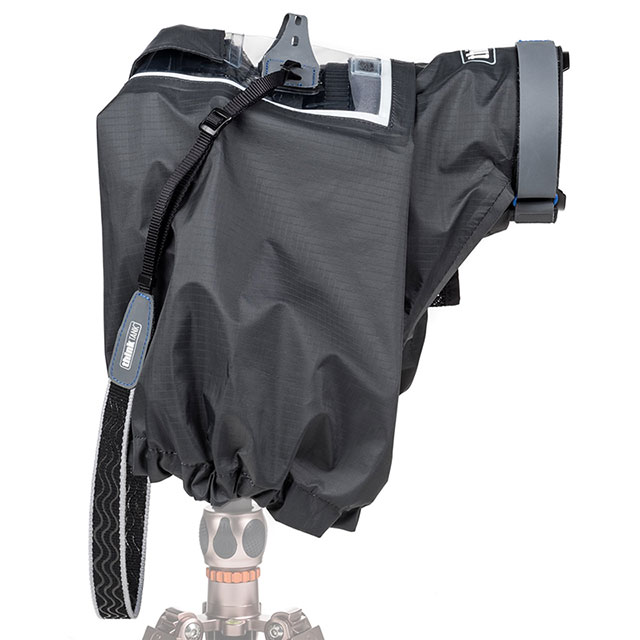
Think Tank Introduces Hydrophobia V3.0 Advanced Camera Rain Covers including new sizes for Sony Full-Frame Mirrorless and Wide Angle Lenses. Hydrophobia V3.0 covers feature DWR (Durable Water Repellent) coating and is made from three layers of material for durability. It is also seam-sealed for added protection against rain, sleet, snow, sand, and dust. Fold it down to fit into the included compact carrying pouch and slip it into your camera bag so you’re prepared in a downpour or sand storm.
Hydrophobia V3.0 Advanced Camera Rain Covers feature a non-slip, adjustable strap that cinches to the lens hood so it stays put once in place. It can be used while shooting atop a tripod or monopod and has an oversized window for viewing your LCD and controls. Additionally, two cinchable sleeves provide easy access to your camera functions.
Think Tank Hydrophobia M 24-70 V3.0 ($115) from B&H Photo |
Amazon
Fits Sony full-frame mirrorless camera bodies with a 24-70mm f/2.8, 24-105mm f/4, 16-35mm f/2.8, 14-24mm f/2.8, or similarly-sized wide-angle and standard zoom lens.
Think Tank Hydrophobia M 70-200 V3.0 ($125) from B&H Photo |
Amazon
Fits Sony full-frame mirrorless camera bodies with a 24-70mm f/2.8, 70-200mm f/2.8, 80-400mm f/5-6.3, 100-400mm f/5-6.3, or similarly-sized lens standard zoom lens.
Think Tank Hydrophobia DM 300-600 V3.0 ($150) from B&H Photo |
Amazon
Fits Sony full-frame mirrorless camera bodies with large telephoto zooms and prime lenses from 150-600mm f/5.6-6.3 up to 600 f/4 lens.
Lens Mount Adapters
One of the best features of mirrorless cameras is that, due to their thin body design, it’s possible to mount a huge array of lenses on them using lens mount adapters. Sony a7R III cameras allow you to use virtually every make of 35mm lenses with the full angle of view for which those lenses were designed.
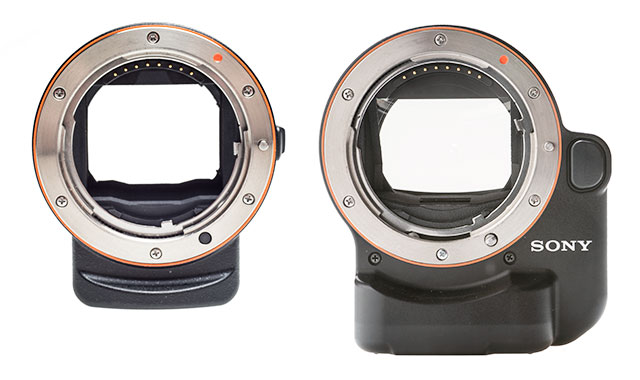 Sony LA-EA3
 (
Amazon |
B&H Photo) and
Sony LA-EA4 lens mount adapters (
Amazon |
B&H Photo)
There are far too many option to mention here, so they’ve discussed in detail in this Guide to the best lens mount adapters for Sony E-Mount cameras:
Ultimate Guide to Sony Lens Adapters
Extension Tubes
Vello EXT-SFED Deluxe Auto Focus Extension Tube Set for Sony E-Mount Lenses are compatible with Sony full-frame and APS-C cameras and Sony FE and E mount lenses. Extension tubes extend the close focus range of any lens making them well suited for close-up portraiture and macro photography. This set contains two extension tubes, one 10mm, and one 16mm. They can be used individually or together to create the desired magnification effect. Extension tubes have no optical elements so they do not degrade the quality of your lenses and these fully automatic extension tubes communicate all electronic functions from lens to camera including autofocus and auto exposure. They are built with metal lens mounts for durability and longevity and enable you to convert your E-mount lens into a macro lens while maintaining the lens’ original optical quality.
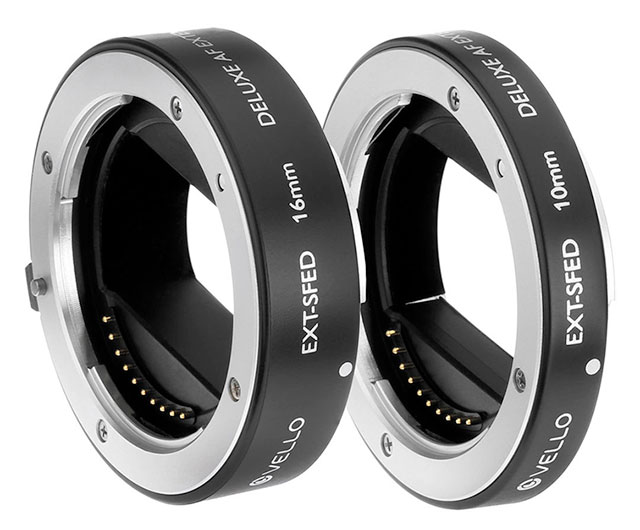 Vello EXT-SFED Deluxe Auto Focus Extension Tube Set for Sony E-Mount Lenses
External Recording Monitors
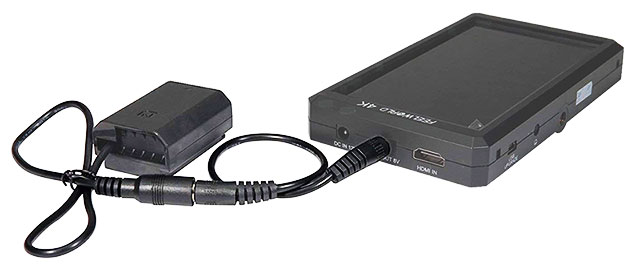
 Atomos Ninja V 5-Inch 4K HDMI Recording Monitor ($695)
 packs top-of-the-line features into a small sleek 1″ (2.5cm) aluminum body crafted for maximum durability yet weighing in at just 11oz (320g).
Bright 5.2-inch 10-bit HDR full HD 1920×1080 display has an astounding 1,000 nits of output which makes it usable even in bright sunlight. It supports recording up to 4K60p and offers a full hour run time from a single Sony L-Series Battery.
Atomos Ninja V records to Mini SSDs available up to 2TB with 500MB/s Read/Write speed. Ninja V supports a Log Formats and is HDR-compatible (PQ and HLG) supports 10-Bit 4:2:2 ProRes and DNxHR making it the ideal recording monitor for the new Sony FS5 II XDCAM E-Mount camcorder.
Designed with a new user interface, the Ninja V’s HDR functions are accessed through the MON buttons and its ProRes options are chosen via the arrows on the unit’s upper left corner. The Ninja V can record to both AtomX SSDmini or standard 2.5″ SSD drives, fitting up to 150 minutes of 4K video on an 1TB drive.
Order Atomos Ninja V 5″ Monitor/Recorder from
B&H Photo |
Amazon
-
 Helios is a lens brand from the Soviet Union era, affectionately naming all their lenses with a simple model number. The 44-2 has become a very popular lens in the vintage market, known for it’s swirly-bokeh backgrounds.
The problem many filmmakers have found with this lens is adapting it successfully for video.
Helios is a lens brand from the Soviet Union era, affectionately naming all their lenses with a simple model number. The 44-2 has become a very popular lens in the vintage market, known for it’s swirly-bokeh backgrounds.
The problem many filmmakers have found with this lens is adapting it successfully for video.
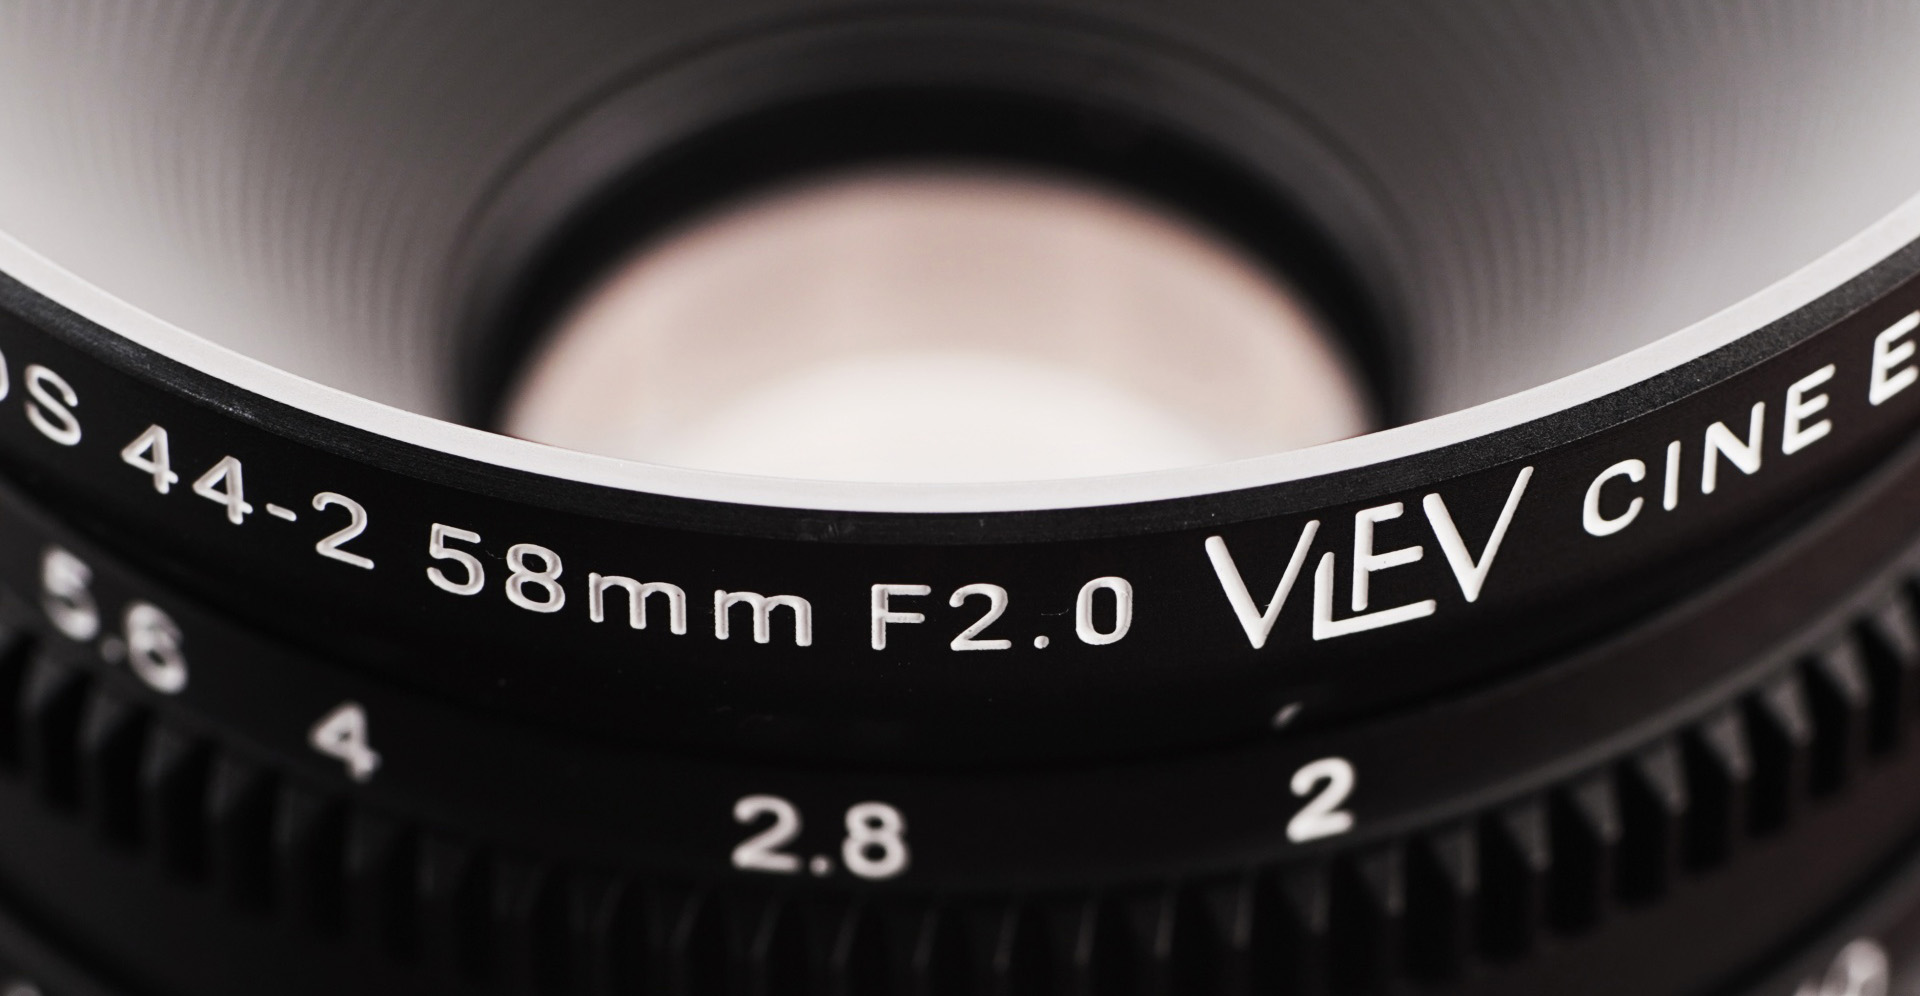 It is M42 mount, meaning any adaption to the likes of Canon EF involves a screw adaptor (easy to unscrew). Focus wheel is tight to the mount and, being old, models generally have some play here and there.
None of this is ideal for video, and a few companies have looked to tackle this by adding gears, spaced front hoods and improved threaded mounts.
Iron Glass has taken it a step further a produced a completely rehoused version, for a very affordable price.
The Cine Helios 44-2 is available in permanent PL or EF mount, focus scale can be etched in feet or meters. Aperture remains on the front in f/stop (no T-stopping) but is de-clicked.
Despite the slightly confusing name, the Cine Helios 44-2 is a 58mm full frame lens.
Focus rotation of the original Helios 44-2 is relatively long, the Cine Helios 44-2 is no exceptional at 270 degrees.
It weighs just over half a kilo (550g/1.2 lbs.) and sports a 95mm clap on front with internal 86mm filter thread.
It is M42 mount, meaning any adaption to the likes of Canon EF involves a screw adaptor (easy to unscrew). Focus wheel is tight to the mount and, being old, models generally have some play here and there.
None of this is ideal for video, and a few companies have looked to tackle this by adding gears, spaced front hoods and improved threaded mounts.
Iron Glass has taken it a step further a produced a completely rehoused version, for a very affordable price.
The Cine Helios 44-2 is available in permanent PL or EF mount, focus scale can be etched in feet or meters. Aperture remains on the front in f/stop (no T-stopping) but is de-clicked.
Despite the slightly confusing name, the Cine Helios 44-2 is a 58mm full frame lens.
Focus rotation of the original Helios 44-2 is relatively long, the Cine Helios 44-2 is no exceptional at 270 degrees.
It weighs just over half a kilo (550g/1.2 lbs.) and sports a 95mm clap on front with internal 86mm filter thread. The price? $950 – pretty reasonable when considering the cost of usual lens rehousing.
Much of this is likely down to the relatively cheap cost of the lens itself, they are fairly common to get hold of and usually fetch for under $100.
Iron Glass has plans for a whole set of Helios rehoused lenses, consisting of 20,28,37,58,85 and 135mm.
You can place orders now, shipping looking like end of December.
Do you like using rehoused lenses? Let us know in the comments below!
The price? $950 – pretty reasonable when considering the cost of usual lens rehousing.
Much of this is likely down to the relatively cheap cost of the lens itself, they are fairly common to get hold of and usually fetch for under $100.
Iron Glass has plans for a whole set of Helios rehoused lenses, consisting of 20,28,37,58,85 and 135mm.
You can place orders now, shipping looking like end of December.
Do you like using rehoused lenses? Let us know in the comments below!


